|
|
One of the type of famous microcontroller around the word is PICmicro microcontroller manufactured by Microchip Inc of the U.S. Even though there are so many kind of microcontroller under PICmicro family, the PIC16F84/A is the best one for beginner to understand PICmicro family microcontroller.
PIC16F84/A Microcontroller
Actually PIC16F84/A is not the best microcontroller under PICmicro family, but some feature of the microcontroller made easy to programming the microcontroller it self. Only use small part, we can simple build programmer for microcontroller. Compare with other microcontroller like Atmel 89C51 that need some complex circuit for programmer.
This is because PIC16F84/A use “Flash” technology for their Program Memory. We can program and erase up to 1000 times even more! Below is the list of some good feature of the PIC16F84/A microcontroller :
Capacity of Program Memory is 1024 ( 1K ) x 14 on Flash Memory
RAM capacity 68 byte
Data Memory on EEPROM 64 byte
Have 13 I/O divided into 2 ports ( Port A = 5 bits and Port B = 8 bits )
Only have 35 instruction due to RISC-type computer
Have Timer 8 bit with Pre-scaler facility
Watch dog Timer with it’s own internal oscillator
All I/O ports can direct drive for LED
Allow In Circuit Serial Programming (ICSP)
Only have 18 pin count on the DIP package format
 Figure 1. Microcontroller PIC16F84/A
Pin Diagram of Microcontroller PIC16F84/A
Micro controller PIC16F84/A come with 18 pin, this small foot print make this micro controller easy to “embbed” to our project.
Here is the pin diagram of PIC16F84/A.

Figure 2 Pin Diagram PIC16F84/A
Power
a. Vdd : +5 Volt for Micro controller
b. Vss : ground
System
a. MCLR : Master Clear ( Reset ) active low for microntroller. Normally pull up with 10K resistor to Vdd. Vpp ( Programming Voltage ) during programming
Oscillator
a. OSC1/CLKIn : Input Osc or pin for XTAL/Resonator
b. OSC2/CLKOut : Output Osc or pin for XTAL/Resonator
Port A
a.RA0 through RA4 (TOCKI = input for Timer Module)
Port B
a.RB0 ( input for INT = interrupt facility )
b.RB1 through RB5
c. RB6 ( Input Clock during programming)
d. RB7 ( Input Data during programming )
How to Use Microcontroller?
Before you can use microcontroller for your purpose, first you must make a programmer. The programmer is to “download” instruction to the chip. One of the simple programmer given below.

Figure 3 Circuit of Progammer PIC16F84/A

Figure 4 Sample of PIC16F84/A Programmer with ZIF Socket
To become useful, programmer PIC16F84 must have a software associated that run on PC. For this purpose we can use PicProg as shown on below image.
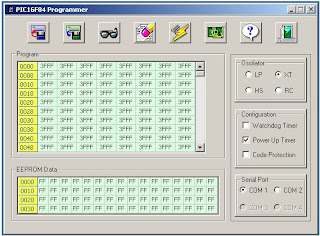
Figure 5. PicProg
How to use this software?
1. Open picprog by clicking it’s icon.
2. Click “open” button and select file that want to download to microcontroller (file must have extension .hex )
3. Select Oscillator ( RC,XT etc ) based on our oscillator use
4. Select Configuration ( normally Power Up Timer ) see Fig.5
5. Serial port will be choose automatically
6. After that, simply click “Program” button
7. After this moment, program ( *.hex ) for microcontroller will be transferred to microcontroller.
8. Microcontroller are ready to be use.
Besides of this operation, Picprog still have other useful button.
a. Read button. This button use for read the content of microcontroller
b. Erase button. This button use for erase the content of microcontroller.
How to change EEPROM Data?
Simply double clicks on EEPROM data and change the content ( default content are FF)
Make file Hexa
In order to program microcontroller,we need a file that have extension .hex. How to make it? Fist we must write our program use editor text such as Notepad. Save file and give extension .asm ( assembler ). After that compile that file using MPASMWin.

Figure 6. MPASMWin
Use this software as follow :
1. Click on button “browse”
2. Find the right file ( *.asm )
3. Change processor type to PIC16F84
4. Other set as default
5. Click “Assemble”
If error occurred, file *.err will be generated. Open this file using Notepad or other text editor software. And fix the problem.

Figure 7. Result MPASM OK
 Figure 8. MPASM Error
No comments:
Post a Comment